The Complete Guide to Painting Aluminum Window Trim
Apr 24, 2025The Complete Guide to Painting Aluminum Window Trim
Aluminum window trim is a durable and low-maintenance feature found on many homes throughout Southeastern Wisconsin. However, even this sturdy material isn’t immune to the effects of time and weather. Over the years, exposure to sun, rain, snow, and temperature swings causes the factory-applied finish to fade, chalk, or peel, leaving the trim looking neglected and the home less visually appealing. Restoring aluminum trim isn’t as simple as applying a new coat of paint. In fact, aluminum presents unique challenges because of its smooth, nonporous surface, which makes it notoriously difficult for paint to bond to. That’s why proper preparation, the right products, and precise application techniques are absolutely critical for a lasting, professional finish. At Two Day Painting, we’ve fine-tuned a detailed process that ensures stunning results that hold up year after year.
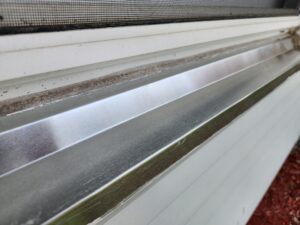
The first step in the process is addressing any areas of peeling or flaking paint. Before anything else can be done, the trim must be thoroughly inspected and all loose or failed coatings must be scraped away. This isn’t a superficial task—paint that is only partially bonded will eventually fail, so we test even the edges of intact-looking paint to ensure they’re solid. If they lift or flake with gentle scraping, they come off. We typically use hand tools like metal scrapers or putty knives to remove this material, being careful not to gouge or damage the trim underneath. In areas with extensive failure, we may use oscillating tools or wire brushes to speed up the process. The goal is to leave the surface sound and ready for further treatment—not simply cleaner, but completely stable.

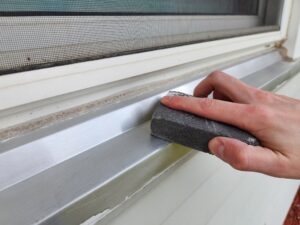
Once the failed paint is removed, we move on to scuff sanding, a crucial step that’s often skipped in do-it-yourself attempts. This part of the process involves thoroughly sanding the entire surface, including areas of exposed metal and previously painted sections, to create microscopic grooves in the aluminum. These grooves provide the mechanical bond that both primer and paint need in order to adhere properly. Aluminum is naturally slick and resistant to adhesion, so this step cannot be overstated. We usually sand by hand using medium grit sandpaper, typically in the 180 to 220 range. The objective is not to remove material, but to dull the surface and give it a uniform texture that invites primer to settle in and grip tight.
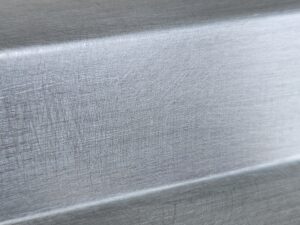
After sanding, the trim will be coated with dust and debris that must be removed before priming. This is where cleaning comes in. We use a combination of methods to ensure the surface is free of contaminants—most commonly a simple wipe down with a dry or damp rag. If there are excessive containments like mildew and dirt staining, usually a mild detergent and water solution for basic dirt and oils, followed by a rinse and dry period is more than enough. For especially stubborn residues, such as oxidation or chalking that didn’t come off during sanding, we may turn to a product called TSP (trisodium phosphate). Hand-cleaning is essential, as even invisible residues can compromise the primer’s ability to bond. After the cleaning, the surface is allowed to dry completely to eliminate any moisture that could interfere with the next step.
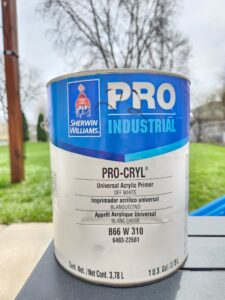
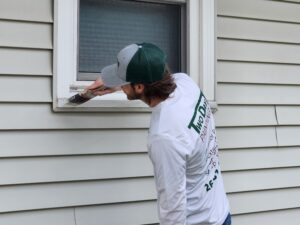
Now we’re ready for the first coating layer: a professional-grade primer that’s designed to bond to metal and resist corrosion. For aluminum window trim, we trust Sherwin-Williams Pro-Cryl Primer. This is not your average primer—it’s an industrial grade formulated primer specifically for slick, nonporous materials like aluminum and galvanized metal. It not only promotes adhesion but also inhibits rust and corrosion, even in high-moisture environments. Once mixed thoroughly, we apply the Pro-Cryl with precision, either by brush, roller, or sprayer depending on the surface profile and accessibility. The coat is applied evenly, without excessive build-up, and we watch carefully for drips or pooling in corners. After application, the primer is allowed to dry thoroughly. Under typical conditions, it can be top-coated in as little as an hour, but we often give it extra time to ensure optimal performance, especially on humid Wisconsin days.
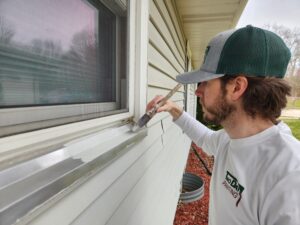
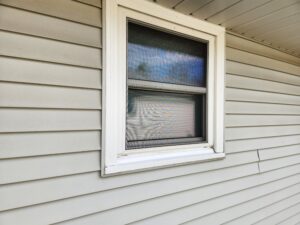
Once the primer has fully cured, we proceed to the final stage: applying two coats of Sherwin-Williams Emerald Rain Refresh exterior paint in a satin sheen. This premium exterior coating is one of the most advanced products on the market. What makes it stand out is its self-cleaning technology, which allows rainwater to wash away dirt and debris, keeping the trim looking fresh and clean with minimal maintenance. This is a major benefit for homeowners in Southeastern Wisconsin, where changing seasons and weather extremes can cause buildup and grime on painted surfaces. Emerald Rain Refresh is also highly resistant to mildew, cracking, and color fading—making it the ideal choice for long-term durability and curb appeal. Its exceptional flexibility allows it to expand and contract with aluminum during temperature shifts, which reduces the risk of peeling or blistering over time.

We then apply the paint in two separate coats, allowing each to dry fully between applications. Typically, we allow a minimum of several hours between coats, but depending on weather conditions, this can vary. Each coat is applied evenly and smoothly, with careful attention paid to coverage in detailed trim areas such as corners, window edges, and joints. We use a combination of high-end brushes and mini rollers to ensure precision, especially around window glass and caulk lines. The satin sheen offers the perfect balance—it’s low-reflective enough to hide imperfections while still catching the light with a subtle, elegant glow that elevates the entire exterior.
During this process, we also evaluate the surrounding areas of trim for failed caulk, cracks, or gaps. If necessary, we remove old caulk and reapply fresh, paintable exterior-grade elastomeric caulk to seal those gaps. This step not only improves appearance but also provides additional protection against water intrusion and thermal movement.
Painting aluminum trim the right way is not a quick or easy job. It requires careful preparation, the right materials, and an experienced hand to ensure the finish not only looks flawless but holds up through years of Wisconsin weather. That’s where Two Day Painting comes in. For over a decade, we’ve been Southeastern Wisconsin’s trusted choice for residential painting. With more than 6,000 homes painted, our reputation is built on consistent quality, honest service, and exceptional results. We’ve proudly been awarded the Top Choice Painter Award four years in a row, a recognition that reflects the trust and satisfaction of the communities we serve.
When it comes to painting aluminum trim, don’t settle for shortcuts or subpar products. Let the professionals at Two Day Painting give your home the care it deserves, with a finish that looks sharp, performs reliably, and elevates your curb appeal for years to come. If you’re located in or around Waukesha, Brookfield, Pewaukee, or the greater Milwaukee area, give us a call today to schedule your free, no-obligation quote. Experience the difference that craftsmanship and care make—with Two Day Painting, you’re not just getting a paint job, you’re getting peace of mind.