How to Properly Prep and Paint Aluminum: A Complete Guide
Apr 24, 2025How to Properly Prep and Paint Aluminum: A Complete Guide
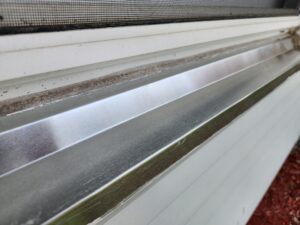
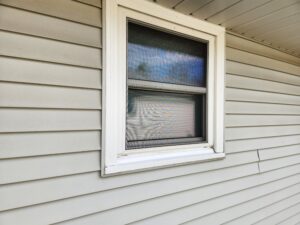
Aluminum window trim is a common architectural detail on homes across Southeastern Wisconsin, offering durability and a clean, modern look. But over time, exposure to the elements can cause the factory finish to fade, chalk, or peel—leaving your home looking tired and worn out.
Fortunately, aluminum trim can be restored beautifully with proper surface preparation and premium coatings. But here’s the catch: painting aluminum is not like painting wood. If you skip key steps, the paint may peel, blister, or fail prematurely. That’s why this guide exists—to walk you through the professional, long-lasting process we use at Two Day Painting to ensure flawless, durable results every time.
Step 1: Scraping Peeling Paint
The first and most critical step in restoring aluminum trim is removing any loose or peeling paint.
Aluminum is non-porous, so any old paint that has lost adhesion will continue to flake under new coats. We use a hand scraper or putty knife to carefully remove any areas where the old paint is failing. In some cases, we also use wire brushes or oscillating tools for more stubborn spots.
🔍 Pro Tip: We don’t just scrape what’s visible. We test edges of intact paint to see if they lift easily—if they do, it’s not bonded properly and must be removed.

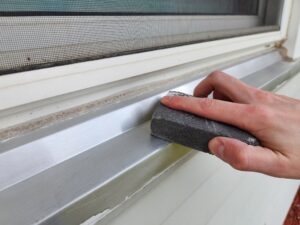
Step 2: Scuff Sanding Bare Metal
Once the peeling areas are scraped clean, we move to scuff sanding—a step many DIYers overlook but is absolutely essential.
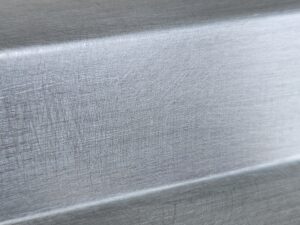
Aluminum is a slick, smooth material. Paint needs something to grip onto. Scuff sanding creates microgrooves in the surface, allowing the primer to adhere securely. We use medium-grit sandpaper (typically 180–220 grit) to dull the sheen and roughen the surface, especially in bare metal areas.
✨ Why This Matters: Without sanding, the primer and paint will sit on the surface like oil on glass. Even the best products will fail without this mechanical bond.
Step 3: Hand Cleaning
After sanding, there’s a layer of dust, oils, and microscopic debris sitting on the trim. This must be removed before any primer goes on. We commonly use a clean dry or damp rag to wipe the surfaces clean, or in some cases, a TSP product, to wipe down the surfaces if there is heavy excessive oxidation.
Once cleaned, we allow the trim to dry completely before moving on.
🧼 Important Note: Any contaminants left behind can cause adhesion issues, bubbling, or “fisheyes” in the paint. That’s why we never skip this simple but powerful step.
Step 4: Priming with Sherwin-Williams Pro-Cryl®
Here’s where the real magic begins.
We apply a coat of Sherwin-Williams Pro-Cryl® Universal Primer—a professional-grade, corrosion-resistant primer specifically designed for tough-to-coat substrates like aluminum, galvanized metal, and hard plastics.
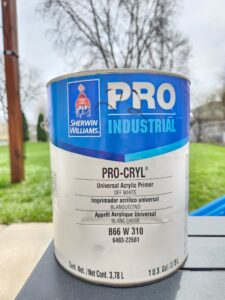
Why Pro-Cryl?
- Exceptional adhesion to metal
- Rust-inhibitive and resistant to moisture
- Fast drying—ready for topcoat in as little as 1 hour
- Bonds even to chalky or oxidized metal with proper prep
We typically apply the primer using a brush and roller or sprayer, depending on the job size. We ensure even coverage without runs or sags, and allow it to fully dry before applying any paint—usually 1–2 hours, but longer if humidity is high.
💡 Pro Insight: Pro-Cryl is more than just a base coat—it’s a bridge between slick metal and your finish paint. Without it, even high-end paints will peel.
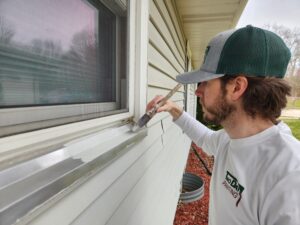
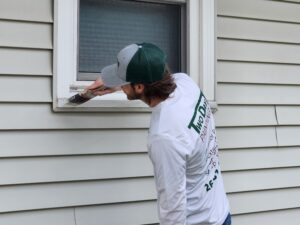
Step 5: Top Coating with Sherwin-Williams Emerald Rain Refresh
Once the primer has dried and bonded properly, it’s time for the final step: applying two top coats of Sherwin-Williams Emerald® Rain Refresh with a satin sheen.
Why Emerald Rain Refresh?
Emerald Rain Refresh is the gold standard for exterior trim painting. Here’s why we swear by it for aluminum:
- Self-cleaning technology: Dirt washes away with rain, keeping trim clean year-round
- Resists mildew and stains: Great for Wisconsin’s fluctuating moisture levels
- Excellent color retention: Your trim won’t chalk, fade, or yellow over time
- Extreme durability: Holds up against freeze-thaw cycles, UV rays, and rain

We apply two thin and even coats, allowing a full 4 hours of dry time between coats. This ensures proper curing and minimizes risks of blistering or poor adhesion.
🎯 Finish Tip: We use a high-quality synthetic brush for precision on trim edges and a mini roller or sprayer for smooth, even application on flat surfaces. The satin sheen offers a perfect balance between shine and subtlety—ideal for trim that pops without looking glossy.
Bonus Step: Optional Caulking
If we notice any gaps or failing caulk joints around the aluminum trim during prep, we’ll address it using a paintable, exterior-grade elastomeric caulk. This prevents water infiltration and provides a crisp, finished look.
Why Trust Two Day Painting for Aluminum Trim?
Painting aluminum window trim is not a weekend DIY project. It requires professional tools, detailed prep, and knowledge of material-specific coatings. That’s why homeowners throughout Southeastern Wisconsin turn to Two Day Painting.
- Over 10 years in business
- 6,000+ homes professionally painted
- Winner of the “Top Painter” award four years in a row
- Fully insured, licensed, and known for prompt, respectful crews
- Local to Waukesha, Milwaukee, and surrounding communities
We don’t just slap paint on—we restore your home’s exterior detail with lasting craftsmanship and premium materials. From Waukesha to Brookfield to Mequon, we’ve helped thousands of homeowners revive their curb appeal the right way.
Ready to paint your Aluminum?
If your aluminum window trim is dull, faded, or peeling, don’t wait until corrosion sets in. Contact Two Day Painting for a professional, long-lasting transformation. We offer free, no-pressure quotes.
🏠 Let your home shine with trim that looks sharp, protects better, and lasts for years to come.